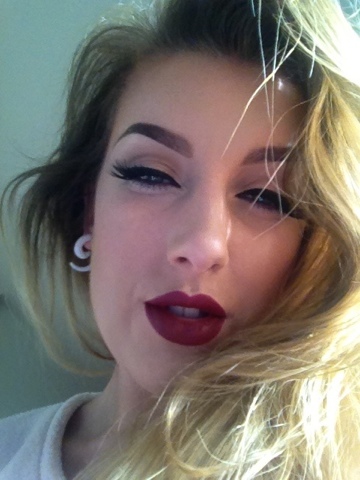
The face:
I started by using the F55 small duo fibre foundation brush from Sigma and Revlon Photoready Airbrush Mousse Makeup in the colour Shell to the cheekbones, forehead, chin and underneath the eyes. I then used the same foundation in the colour Natural Beige on the rest of the face as this shade matches with the tone of my neck. This means any areas of the face covered with the shade Shell are naturally highlighted giving the face a more airbrushed look.
Using the same brush, I stippled a small amount of MAC NW15 Studio Finish Concealer underneath the eye area, around the nose and a small amount through the cheeks just to add a bit more coverage as these areas can tend to get a bit red throughout the day.
To set the foundation and to mattify the skin I used Inglot AMC Powder in the number 55 all over the face and contoured the forehead, nose, lip and cheekbones with Inglot Pressed Powder in the number 31 and a Sigma F35 tapered brush.
I applied a mixture of MAC Pinkswoon and MAC Fleur Power blusher to the apples of the cheeks using a Sigma F15 duo fibre blush brush to give the cheeks a more rounded appearance.
The eyes:
You want to achieve the 'no makeup' makeup look with the shadows on the eyes. Similar to contouring you want to create seamless shadows and highlights, so blending is key.
I firstly filled in the brows using an Inglot 17TL brow brush and Inglot 329 chocolate matte brown eyeshadow. I paid extra attention to the arch and extension of the tail and used very little product on the inside of the brow. This makes the brow appear more natural. To achieve a clean, sharp brow I carved out the underneath of the brow line using a flat concealer brush and Studio Finish Concealer in NW15. This colour is a few shades lighter than my skin tone so it will act as a natural highlight to the brow bone.
Using my ring finger, I applied MAC Painterly Paintpot and blended it from the lash line into the concealer underneath the brow. This will act as a base/primer to the eyeshadow and brighten the lid, yet still giving coverage to any blue undertones on the lid.
Using a large fluffy brush, I used an Inglot 4SS blender brush, and I applied Inglot 352 matte pale pink eyeshadow on the full eyelid. Using the same brush (because it's tapered) I applied a shade 2-3 shades darker than the lid colour to create a shadow effect and give definition to the crease. I used Inglot 357, a wam matte neutral tone to do this.
I used my favourite liner, Inglot 77 black gel liner, to create the classic 50's flick eyeliner look, making sure it was a thin line on the inside, getting thicker at the outside corner of the eye and extended out into a tapered flick towards the tail of the brow.
Lashes:
I removed the Inglot 16N lashes from the box carefully from the outside corner of the lash using a tweezers. I was extra careful doing this a I didn't want to distort the shape of the lash because this would effect how the lash sits on your eye making them unwearable. I then took some Inglot 22S long individual lashes and I attached these to the lashband of the 16N lashes at the outside corner using clear DUO Glue. I did this about a third of the way into the lash from the outside to achieve that winged, cat-eye lash look. I used the same clear DUO Glue to apply the lashes to the eye. Once set, I went over the lash band with the gel liner again.
I then applied Inglot False Lash Mascara and I wiggled the product through my own natural lashes. This application technique will weave your natural lashes into the false ones so the two sets of lashes appear as one and sit on top of each other comfortably.
The Lips:
I firstly applied a small amount of MAC Diva matte lipstick to the lips, not going too close to the natural outline of the lip. I then used Kryolan lip liner in the colour 910 to line the lip on the very outside of the natural lip line to give the appearance of a fuller lip. This is personal preference if you want your lips to appear fuller or not.
Thre ya have it guys!! Try it out yourselves
J xxx
No comments:
Post a Comment